Terminal Communications
This appendix describes the processes for establishing a terminal connection, loading the Cisco 700 IOS software (also known as the software image), and loading and saving the current configuration.
Establishing a Terminal Connection
By connecting an ASCII terminal or PC running terminal emulation software, you can configure the router through a serial connection. This might not be necessary for the following reasons:
•![]() The router is preconfigured by a vendor or network administrator to be "plug-and-play."
The router is preconfigured by a vendor or network administrator to be "plug-and-play."
•![]() The router will be configured using Trivial File Transfer Protocol (TFTP) and can "discover" its configuration.
The router will be configured using Trivial File Transfer Protocol (TFTP) and can "discover" its configuration.
The example in this section shows how to connect to the router serial communications port from your ASCII terminal or PC by using Hyperterminal. (Hyperterminal is an accessory software application included with the Windows operating system.)
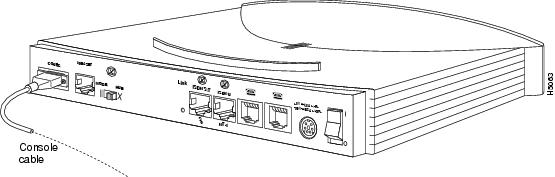
Step 1 ![]() Connect the blue DB-9-to-DB-9 serial cable from your terminal to the rear-panel port labeled CONFIG. (See .)
Connect the blue DB-9-to-DB-9 serial cable from your terminal to the rear-panel port labeled CONFIG. (See .)
If your terminal or PC console has a DB-25 connector, use the included DB-25-to-DB-9 adapter. If you are connecting the router to a Macintosh computer, you need a straight-through RS-422-to-DB-9 or RS-422-to-DB-25 cable.
Figure B-1 Console Cable Connection (Cisco 766 Shown)
Step 2 ![]() Connect the other end of the console cable to the ASCII terminal or PC.
Connect the other end of the console cable to the ASCII terminal or PC.

Note ![]() The router is a data communications equipment (DCE) device. A crossover cable is not required.
The router is a data communications equipment (DCE) device. A crossover cable is not required.
Step 3 ![]() Start HyperTerminal. Click Start>Accessories>HyperTerminal. The Connection Description window displays.
Start HyperTerminal. Click Start>Accessories>HyperTerminal. The Connection Description window displays.
Step 4 ![]() Enter a name in the Name field of the Connection Description window. When you click OK, the Phone Number window displays.
Enter a name in the Name field of the Connection Description window. When you click OK, the Phone Number window displays.
Step 5 ![]() Select the COM port from the Connect using list to which the router is connected. For example, if the router is connected to the COM2 port of your PC, select Direct to COM2. When you click OK, the Port Settings window displays.
Select the COM port from the Connect using list to which the router is connected. For example, if the router is connected to the COM2 port of your PC, select Direct to COM2. When you click OK, the Port Settings window displays.
Step 6 ![]() Set the port as follows:
Set the port as follows:
•![]() Bits per second = 9600
Bits per second = 9600
•![]() Data bits = 8
Data bits = 8
•![]() Parity = None
Parity = None
•![]() Stop bits = 1
Stop bits = 1
•![]() Flow control = None
Flow control = None
Note ![]() The configuration port does not support hardware flow control.
The configuration port does not support hardware flow control.
Step 7 ![]() Power on the router.
Power on the router.
Step 8 ![]() Click OK to connect. You can test the connection by pressing Enter. A command-line interface prompt appears.
Click OK to connect. You can test the connection by pressing Enter. A command-line interface prompt appears.
It is assumed that this is a new connection. Once it is created, you can save the Connection Description by selecting File>Save As.
No comments:
Post a Comment